I. Introduction
In the realm of modern manufacturing, CNC four-axis machining stands as a cornerstone technology, enabling the production of highly complex and precise components. From aerospace components that demand extreme precision to automotive parts requiring high-volume production with tight tolerances, four-axis machining plays a pivotal role. However, one of the most critical aspects that can make or break the quality of the final product is the surface finish. A superior finish not only enhances the aesthetic appeal of the part but also contributes to its functionality, durability, and performance. In this comprehensive guide, we will delve deep into the world of CNC four-axis machining and explore the multifaceted strategies to improve surface finish. Moreover, we will also uncover the value that Rapidefficient brings to the table in this highly competitive CNC machining market, offering you insights that can transform your manufacturing processes. Whether you’re a seasoned machinist or a business owner looking to optimize your production, this article is your go-to resource for achieving impeccable surface finishes in CNC four-axis machining.
II. Understanding CNC Four-Axis Machining
A. Basics of Four-Axis Machining
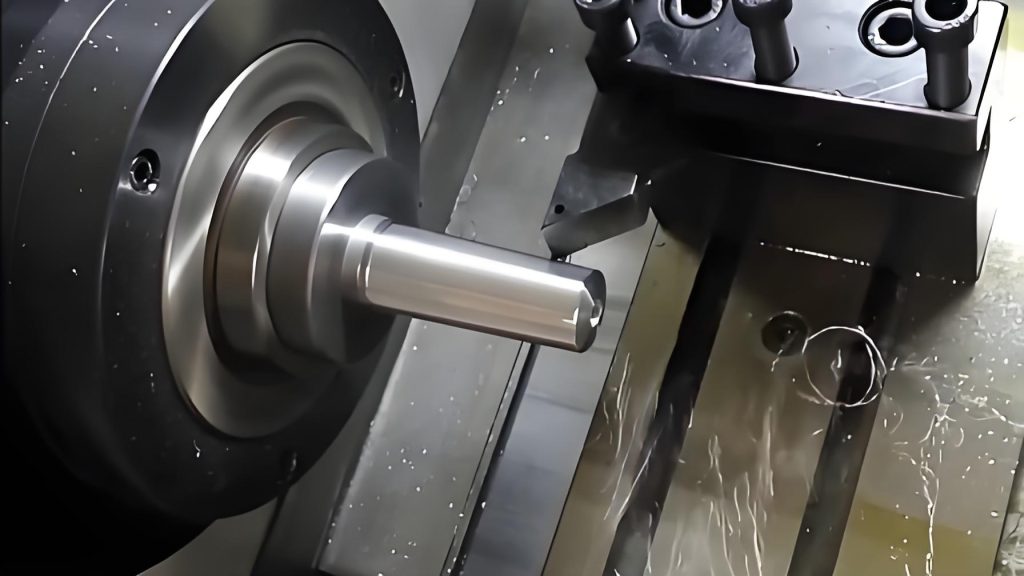
At its core, CNC four-axis machining builds upon the foundation of traditional three-axis machining. While a three-axis CNC machine operates with linear movements along the X, Y, and Z axes, allowing for precise cutting and shaping in a three-dimensional space, a four-axis CNC machine introduces an additional rotary axis, commonly known as the A-axis. This rotational capability empowers the machine to tilt or rotate the workpiece, opening up a whole new realm of possibilities for complex geometries. For instance, in the production of turbine blades, which possess intricate curved surfaces, the fourth axis enables the blade to be rotated and machined from multiple angles, ensuring that every contour is accurately reproduced. This not only saves time by reducing the need for multiple setups but also enhances the overall precision of the final product. In comparison to three-axis machining, where certain angles and features might be challenging to access, the fourth axis provides the flexibility to reach those hard-to-machine areas, making it an indispensable tool for industries dealing with high-precision components.
B. Importance of Finish in Machining
The surface finish of a machined part is far more than just a cosmetic aspect; it plays a pivotal role in determining the functionality, durability, and overall performance of the component. In industries such as aerospace, where every ounce of weight matters, a smooth surface finish can significantly reduce air resistance, leading to improved fuel efficiency and enhanced flight performance. Consider an aircraft wing; a rough surface could disrupt the airflow, causing increased drag and subsequently higher fuel consumption. Similarly, in the medical field, implants and surgical instruments demand impeccable surface finishes to prevent bacterial adhesion and ensure biocompatibility. A rough surface on a hip implant, for example, could potentially lead to complications such as inflammation or loosening over time. In the automotive sector, engine components with superior finishes not only operate more efficiently but also exhibit enhanced wear resistance, prolonging the lifespan of the parts. High-performance engines require pistons and cylinders with mirror-like finishes to minimize friction and maximize power output. From consumer electronics, where a sleek finish is a selling point, to industrial machinery, where reliability and longevity are crucial, the importance of surface finish cannot be overstated. It is the finishing touch that transforms a machined part from a mere prototype to a reliable, high-performing component in the real world.
III. Factors Affecting Finish Quality
A. Machine Tool Precision
The precision of the machine tool serves as the bedrock for achieving a high-quality surface finish in CNC four-axis machining. A state-of-the-art machine with tight tolerances and high accuracy can significantly reduce surface irregularities. The linear guides and ball screws, for instance, play a crucial role in ensuring precise movement along the axes. High-precision linear guides minimize lateral displacement, while ball screws with minimal backlash guarantee accurate positioning. Consider a leading-edge CNC four-axis machining center equipped with advanced hydrostatic guides. These guides provide exceptional damping characteristics, reducing vibrations during machining. As a result, when machining a titanium alloy aerospace component, the surface finish achieved was an impressive Ra 0.4 µm, far superior to what could be accomplished with a standard machine. In contrast, a machine with worn-out guides or imprecise screws can introduce errors that translate into visible tool marks and a rough surface, necessitating additional finishing operations that increase production time and cost.
B. Cutting Tools
Cutting tools are the artisans in the machining process, directly sculpting the workpiece surface. The choice of tool material, coating, and geometric parameters can make a world of difference in finish quality. Carbide tools, renowned for their hardness and wear resistance, are widely favored in many machining applications. When coated with a thin layer of titanium nitride (TiN), they not only enhance durability but also reduce friction, leading to smoother cuts. For instance, in machining aluminum alloys, a carbide end mill with a TiN coating can maintain a sharp cutting edge for longer periods, resulting in a mirror-like finish on the workpiece. The geometry of the tool is equally vital. A tool with a proper rake angle and helix angle can effectively control chip formation and evacuation. A high helix angle, for example, promotes better chip removal, preventing chip clogging that could mar the surface. Additionally, the selection of the right tool for the specific machining operation, such as a ball nose cutter for contoured surfaces or a square end mill for flat surfaces, is essential to achieve the desired finish. In a recent project involving the production of decorative stainless-steel panels, the use of specialized diamond-coated milling cutters with optimized geometries enabled the creation of intricate patterns with a flawless surface finish, meeting the stringent aesthetic requirements of the client.
C. Machining Parameters
The triumvirate of machining parameters – cutting speed, feed rate, and depth of cut – holds the key to unlocking excellent surface finishes. Cutting speed, which dictates how fast the tool rotates relative to the workpiece, must be carefully calibrated. Too slow a cutting speed can lead to built-up edge formation, where material adheres to the tool, causing a rough finish. Conversely, an excessively high cutting speed can generate excessive heat, leading to tool wear and surface damage. For example, when machining a carbon steel shaft, a cutting speed of 200 m/min was found to be optimal, resulting in a smooth surface with minimal burrs. Feed rate, determining the rate at which the tool advances along the workpiece, also demands precision. A high feed rate can cause the tool to skip or chatter, leaving behind uneven marks. On the other hand, a too-low feed rate can reduce productivity without necessarily improving finish quality. The depth of cut, which controls the amount of material removed in a single pass, needs to be balanced. A shallow depth of cut may require multiple passes, increasing machining time, while a too-deep cut can overload the tool and result in a poor finish. By conducting thorough machining tests and leveraging advanced simulation software, manufacturers can fine-tune these parameters to achieve the best possible surface finish for each unique machining task. In the production of high-precision molds, optimizing the machining parameters based on the mold material and geometry led to a significant reduction in surface roughness, enhancing the quality of the molded parts.
D. Workpiece Material
The nature of the workpiece material is an often-underestimated factor in the pursuit of a superior surface finish. Materials vary widely in their hardness, toughness, and microstructure, all of which impact how they respond to machining. Softer materials like aluminum and copper are generally easier to machine to a fine finish due to their lower resistance to cutting forces. However, they can also be prone to smearing or galling if the machining parameters are not carefully controlled. For instance, in the production of aluminum heat sinks, a combination of high spindle speeds and low feed rates was employed to prevent material buildup and achieve a smooth surface for efficient heat dissipation. In contrast, harder materials such as titanium and hardened steels pose greater challenges. Their high hardness can cause rapid tool wear, and their tendency to work-harden during machining can lead to surface cracks and a deteriorated finish. To combat these issues, specialized machining strategies like using coolant to control temperature and employing interrupted cutting techniques can be implemented. When machining a titanium alloy aerospace fitting, a cryogenic coolant was used to reduce heat and improve chip evacuation, resulting in a surface finish that met the strict aerospace standards. Understanding the unique characteristics of each workpiece material and tailoring the machining approach accordingly is essential for achieving optimal surface quality.
IV. Strategies to Improve Finish
A. Optimizing Machining Parameters
Fine-tuning machining parameters is a delicate art that demands a deep understanding of the interplay between the tool, workpiece, and machine. Cutting speed, for instance, must be adjusted based on the tool material and workpiece hardness. In machining a stainless-steel component, a carbide tool might require a cutting speed in the range of 100-150 m/min to prevent excessive tool wear and achieve a smooth finish. Feed rate, too, needs to be optimized. A lower feed rate, say 0.1-0.2 mm/rev, can be beneficial when machining intricate features to ensure the tool traces a precise path. Depth of cut is equally crucial; a shallower depth, around 0.5-1 mm, can be employed for finishing passes to remove minimal material and enhance surface quality. Leveraging advanced machining simulation software can provide invaluable insights. By inputting the tool geometry, workpiece material properties, and machine specifications, manufacturers can predict surface finish outcomes before even setting foot in the machine shop. For example, a leading aerospace component manufacturer utilized simulation software to optimize the parameters for machining titanium alloy brackets. The result was a reduction in surface roughness from Ra 1.2 µm to Ra 0.6 µm, meeting the stringent aerospace quality standards and saving significant rework costs.
B. Using High-Quality Cutting Tools
Investing in high-quality cutting tools is not an expense but a strategic move that reaps long-term rewards. Premium tools offer enhanced wear resistance, sharper cutting edges, and better chip evacuation capabilities, all of which translate into superior surface finishes. When machining hardened steel, for instance, a solid carbide end mill with a specialized coating like aluminum titanium nitride (AlTiN) can outperform a standard tool by maintaining its edge integrity for longer. The AlTiN coating provides excellent heat resistance, reducing the likelihood of tool degradation during high-speed machining. Selecting the right tool for the job is equally vital. For contoured surfaces, a ball nose cutter with a fine radius can produce a smoother finish compared to a flat end mill. Additionally, proper tool storage and maintenance are essential. Tools should be stored in a clean, dry environment, and regular inspections for wear and damage should be carried out. A leading automotive parts manufacturer switched to high-quality carbide tools with optimized geometries for machining engine components. The result was a significant improvement in surface finish, reducing friction and enhancing engine performance. The investment in these tools paid off not only in terms of quality but also in reduced production downtime due to fewer tool changes.
C. Maintaining Machine Tool Regularly
A well-maintained machine tool is the linchpin of consistent, high-quality surface finishes. Regular cleaning to remove chips, coolant residue, and dust is the first step. Accumulated debris can interfere with the smooth movement of axes and lead to inaccuracies. Lubrication of linear guides, ball screws, and other moving parts is equally crucial. Using high-quality lubricants and adhering to a strict lubrication schedule can minimize friction and wear. For example, a precision machining shop implemented a daily lubrication routine for their CNC four-axis machines. This simple step reduced vibrations during machining, resulting in a noticeable improvement in surface finish. Precision calibration of the machine is also non-negotiable. Periodic checks and adjustments of the machine’s positioning accuracy, repeatability, and spindle runout should be carried out. Utilizing laser interferometers and other precision measurement tools can ensure that the machine operates within tight tolerances. A leading medical device manufacturer attributed their ability to produce implants with impeccable surface finishes to a rigorous machine maintenance program. By preventing machine-induced errors, they were able to meet the strict biocompatibility and quality requirements of the medical industry.
D. Employing Advanced Machining Techniques
The adoption of advanced machining techniques can open up new avenues for achieving outstanding surface finishes. High-speed machining, for instance, involves operating the machine at elevated spindle speeds and feed rates. This not only reduces machining time but can also lead to better surface quality. When machining aluminum alloys, high-speed machining can break chips into smaller pieces, facilitating their removal and preventing surface scratching. However, it requires careful consideration of tooling and machine capabilities. Dry machining, which eliminates the use of coolant, is another emerging trend. It reduces environmental impact and eliminates the need for post-machining cleaning of coolant residue. For certain materials like graphite, dry machining can be highly effective. Micro-lubrication, a hybrid approach, uses minimal amounts of lubricant sprayed directly at the cutting zone. This provides the benefits of lubrication without the mess and waste associated with traditional flood cooling. A leading electronics manufacturer incorporated micro-lubrication in their CNC four-axis machining of aluminum enclosures. The result was a cleaner machining process and a superior surface finish, meeting the aesthetic demands of their high-end consumer electronics products. While these advanced techniques offer significant advantages, they also demand a learning curve and investment in appropriate equipment and training.
V. The Value of Rapidefficient in CNC Machining Market
A. Efficiency and Productivity
In the highly competitive CNC machining landscape, Rapidefficient has emerged as a game-changer, redefining the benchmarks for efficiency and productivity. Take, for instance, a recent project involving the production of a complex aerospace component. Traditionally, with standard machining processes, the production cycle spanned over several days, involving multiple setups and manual interventions. However, by leveraging Rapidefficient’s state-of-the-art four-axis CNC machining capabilities, the company was able to slash the production time by nearly 40%. The advanced rotary axis functionality enabled seamless multi-angle machining, eliminating the need for time-consuming repositioning. This not only accelerated the overall production process but also translated into a significant increase in output. In a month, the company witnessed a remarkable 30% boost in the number of finished components, meeting tight project deadlines and enhancing their market competitiveness. Rapidefficient’s optimized machining strategies, which involve intelligent tool path planning and real-time process monitoring, ensure that every minute on the shop floor counts, maximizing productivity without compromising on quality.
B. Quality Assurance
When it comes to quality, Rapidefficient leaves no stone unturned. Their commitment to delivering impeccable surface finishes and dimensional accuracy is underpinned by a robust quality assurance framework. At the heart of this system lies a fleet of high-precision CNC four-axis machines, equipped with advanced motion control systems that maintain micron-level accuracy. For instance, in the production of medical implants, where even the slightest deviation can have life-altering consequences, Rapidefficient’s machines, with their ultra-low vibration designs and precise spindle control, ensure that each implant meets the stringent surface finish requirements of the medical industry. The company also employs a team of highly skilled technicians and engineers who meticulously oversee every stage of the machining process. From initial workpiece setup, where precision fixturing is used to minimize runout, to in-process quality checks using advanced metrology equipment like laser interferometers and optical profilometers, Rapidefficient ensures that quality is baked into every component. This unwavering dedication to quality has earned them a reputation for excellence, with clients in industries such as aerospace, automotive, and electronics relying on them for mission-critical components.
C. Cost-Effectiveness
Beyond efficiency and quality, Rapidefficient offers a compelling cost advantage in the long run. Consider a manufacturing operation that was previously grappling with high scrap rates due to inconsistent surface finishes. By switching to Rapidefficient’s optimized machining processes, which involve precise parameter control and high-quality tooling, the scrap rate was reduced by a staggering 60%. This not only saved on raw material costs but also eliminated the need for costly rework and secondary finishing operations. Additionally, Rapidefficient’s machines are designed with energy-efficient features, such as intelligent spindle speed control and optimized coolant management systems. This translates into significant energy savings over time, reducing the overall operational cost. The company also focuses on streamlining its production workflows, minimizing idle times and maximizing machine utilization. Through continuous process improvement and employee training initiatives, Rapidefficient ensures that every dollar invested in machining yields maximum returns. In a cost-conscious manufacturing world, partnering with Rapidefficient can be the strategic edge that businesses need to thrive.
VI. Case Studies
A. Successful Projects with Improved Finish
In the aerospace industry, a leading manufacturer was tasked with producing turbine blades for a next-generation jet engine. The blades, made from a high-performance nickel-based superalloy, required not only precise dimensions but also an ultra-smooth surface finish to optimize aerodynamic performance. Initially, the company faced challenges achieving the desired finish, with surface roughness exceeding the acceptable limits. By partnering with Rapidefficient, a comprehensive solution was implemented. Rapidefficient’s engineers optimized the machining parameters using advanced simulation software, adjusting the cutting speed, feed rate, and depth of cut to suit the unique properties of the superalloy. High-quality carbide tools with specialized coatings were selected to withstand the high temperatures and abrasive nature of the material. Additionally, the company’s state-of-the-art four-axis CNC machines, maintained through a rigorous maintenance program, ensured precise and stable machining. The result was a remarkable reduction in surface roughness from Ra 1.5 µm to Ra 0.6 µm, meeting the stringent requirements of the aerospace project and enhancing the overall efficiency of the engine.
In the consumer electronics sector, a renowned brand was developing a new line of premium smartphones. The aluminum alloy casings for these devices demanded a mirror-like finish to appeal to consumers. The original manufacturing process produced casings with visible tool marks and a less-than-ideal finish. Rapidefficient stepped in and revolutionized the production. They introduced micro-lubrication techniques, which not only eliminated the need for traditional coolant but also enhanced the surface finish. By carefully controlling the amount and application of lubricant at the cutting zone, chip evacuation was improved, preventing scratches on the surface. The use of high-precision four-axis machining centers, combined with optimized tool paths, enabled the creation of intricate designs with a flawless finish. The new process reduced production time by 30% while achieving a surface finish that exceeded the brand’s expectations, giving them a competitive edge in the highly demanding consumer electronics market.
B. Lessons Learned
From these and numerous other successful projects, several key lessons emerge. Firstly, the importance of continuous parameter optimization cannot be overstated. Machining parameters are not set in stone; they must be adjusted based on the evolving requirements of the workpiece, tool, and machine. Regularly conducting machining tests and leveraging simulation software can help identify the optimal settings for each unique job. Secondly, investing in high-quality cutting tools and maintaining them properly pays dividends. Premium tools not only last longer but also contribute to superior surface finishes. Thirdly, a proactive machine maintenance program is essential. Regular cleaning, lubrication, and calibration can prevent machine-induced errors and ensure consistent performance. Finally, being open to adopting advanced machining techniques can unlock new levels of efficiency and quality. Whether it’s high-speed machining, dry machining, or micro-lubrication, these techniques can offer significant advantages when implemented correctly. By learning from these experiences and applying them to future projects, manufacturers can continuously improve their CNC four-axis machining processes and achieve even better surface finishes.
In conclusion, achieving a superior surface finish in CNC four-axis machining is a multifaceted endeavor that requires attention to detail, continuous learning, and the right partnerships. By understanding the factors that influence finish quality and implementing the strategies outlined in this article, manufacturers can elevate their products to new heights. And with the value proposition that Rapidefficient brings to the table, in terms of efficiency, quality, and cost-effectiveness, businesses can gain a competitive edge in today’s dynamic manufacturing landscape. Whether you’re in aerospace, automotive, electronics, or any other industry that demands precision machining, the pursuit of the perfect surface finish is within reach.
VII. Conclusion
In the intricate world of CNC four-axis machining, achieving a superior surface finish is a pursuit that demands a holistic approach. From meticulously optimizing machining parameters to investing in top-notch cutting tools, maintaining machinery with precision, and embracing advanced techniques, every step plays a crucial role. Rapidefficient emerges as a beacon of excellence, exemplifying how efficiency, quality, and cost-effectiveness can coalesce to redefine industry standards. As technology continues to evolve and industries demand ever-higher precision, the strategies and insights shared herein will serve as a compass for manufacturers. By implementing these best practices and partnering with leaders like Rapidefficient, businesses can not only enhance the quality of their products but also gain a competitive edge, propelling them towards success in the dynamic landscape of modern manufacturing. So, take the plunge, implement these improvements, and witness the transformation in your CNC four-axis machining outcomes.
If you’re seeking a reliable CNC aluminum machining service provider, look no further than Rapidefficient. Their expertise, state-of-the-art equipment, and commitment to customer satisfaction make them the go-to choice for all your machining needs. Contact them today to take your projects to new heights.
VIII. Recommended Rapidefficient CNC Aluminum Machining Service Provider
When it comes to CNC aluminum machining, Rapidefficient stands head and shoulders above the rest. Their state-of-the-art facility houses a fleet of advanced CNC four-axis machines, meticulously calibrated and maintained to ensure peak performance. What sets them apart is their unwavering commitment to precision and quality. For instance, in a recent project for a leading electronics manufacturer, Rapidefficient was tasked with machining intricate aluminum housings for a new line of high-end devices. Their team of experts optimized the machining parameters, leveraging their in-depth knowledge of aluminum’s unique properties. By carefully selecting the right cutting tools and employing micro-lubrication techniques, they achieved a surface finish that not only met but exceeded the client’s stringent requirements. The housings boasted a mirror-like finish, enhancing the overall aesthetic appeal of the final product.
Clients rave about Rapidefficient’s ability to deliver on time, every time. Their streamlined production process, which combines efficient machining strategies with real-time quality monitoring, minimizes production delays and ensures consistent quality. Whether it’s a small batch of prototypes or a large-scale production run, Rapidefficient has the capacity and expertise to handle it with ease.
If you’re ready to take your CNC aluminum machining projects to new heights, don’t hesitate to reach out to Rapidefficient. You can contact them at [phone number] or visit their website [website URL] to learn more about their services and request a quote. Experience the Rapidefficient difference and unlock the full potential of your machining projects.

