Bead blasting is often used when a CNC machined part needs a more uniform matte appearance. It can reduce the visual contrast of tool marks, soften shiny machined surfaces, and prepare selected aluminum parts for anodizing.
But bead blasting is not just a cosmetic step.
The final result depends on the material, media type, pressure, blasting distance, surface condition before blasting, masking method, edge condition, downstream finishing, inspection standard, and packaging.
For CNC buyers, the real question is not only:
Can this part be bead blasted?
The better question is:
Which surfaces should be blasted, what appearance is acceptable, and what features must be protected before finishing?
If those details are missing, the part may be dimensionally correct but still rejected for uneven texture, visible scratches, rounded edges, trapped media, color variation after anodizing, or inconsistent batch appearance.
What Is a Bead Blast Surface Finish?
A bead blast surface finish is created by propelling fine blasting media against the part surface. The impact changes the visible texture and produces a more matte, uniform appearance compared with a standard as-machined surface.
Bead blasting is commonly used on:
| Part Type | Why Bead Blasting May Be Used |
|---|---|
| Aluminum housings | More uniform matte appearance before anodizing |
| Electronic enclosures | Cosmetic surface consistency |
| Robotics brackets | Reduced glare and visible tool marks |
| Automation components | Cleaner industrial appearance |
| Stainless steel parts | Satin-like surface where suitable |
| Prototype parts | Improved visual presentation |
| Consumer-facing metal parts | More consistent visible finish |
| Low-volume CNC parts | Better appearance without complex polishing |
Bead blasting should be reviewed together with the material, part geometry, visible surfaces, edge condition, surface finish requirement, and final inspection. For a broader overview of available finishing routes, see our CNC surface finishes guide.
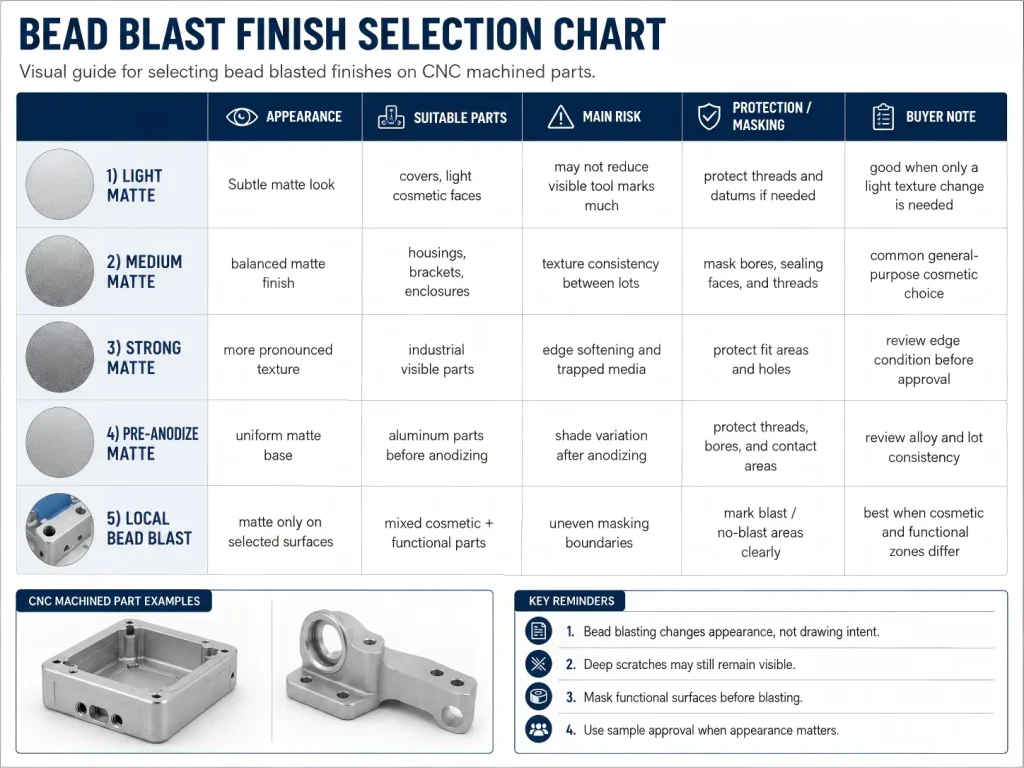
Bead Blast Surface Finish Chart
The chart below is a practical buyer-facing guide. Actual results depend on media, equipment, operator control, part geometry, and the surface condition before blasting.
| Bead Blast Result | Typical Appearance | Common Use | Main Risk to Review |
| Light bead blast | Fine matte texture, subtle visual softening | Aluminum covers, light cosmetic surfaces | May not hide deeper tool marks or scratches |
| Medium bead blast | More visible uniform matte surface | Housings, brackets, enclosures | Can soften sharp edges and change appearance after anodizing |
| Heavy bead blast | Stronger texture, more aggressive matte effect | Selected industrial parts | Higher risk of edge rounding, texture variation, and dimensional concern |
| Pre-anodize bead blast | Uniform texture before anodizing | Aluminum cosmetic parts | Color and texture consistency depend on alloy and process |
| Stainless bead blast | Satin-like appearance where suitable | Stainless covers, brackets, visible parts | Cleaning, passivation, and contamination risk should be reviewed |
| Local bead blast | Only selected areas are blasted | Parts with cosmetic and functional zones | Masking boundaries and protected surfaces must be clearly defined |
| No bead blast on functional areas | Critical surfaces are protected | Threads, sealing faces, bearing bores, datum faces | Masking and inspection must be planned before production |
This chart should not be treated as a fixed standard. It is a starting point for reviewing visual expectations, functional surfaces, masking zones, downstream finishing, and inspection requirements.
The chart should be used as a review guide before quotation, not as a universal finish guarantee.
Bead Blasting Is Not the Same as Polishing
Bead blasting and polishing are often confused, but they create different surface conditions.
| Finish | Main Effect | Buyer Warning |
| Bead blasting | Creates a matte, textured, more uniform appearance | Does not automatically remove deep scratches or machining defects |
| Polishing | Smooths and brightens the surface | May round edges or change dimensions on critical surfaces |
| Brushing | Creates directional grain lines | Direction and consistency must be controlled |
| As-machined finish | Leaves tool marks and cutter path visible | May be acceptable for internal or functional parts |
| Anodizing | Creates oxide layer on aluminum | Bead blast texture can affect final appearance |
| Powder coating / painting | Adds coating film | Masking and thickness affect holes, edges, and assembly |
Another common issue is tool mark shadowing. Bead blasting changes the surface texture and scatters light, but it cannot remove deeper macro-level machining marks, chatter, or large step-over patterns left before finishing. A part may look more uniform from one viewing angle, but under bright inspection lights or after anodizing, deeper cutter marks can still appear as faint shadow lines through the matte surface.
If a premium visible finish is required, the pre-blast surface condition should be controlled before blasting. In some cases, the machining strategy, finishing pass, step-over, light polishing, or acceptable cosmetic sample should be reviewed instead of treating bead blasting as a universal way to hide rough machining. For related machined surface planning, see our surface finish guide for CNC aluminum.
A bead blasted part may look more uniform, but it is not necessarily smoother in the same way as a polished part. It may also make some defects less visible while making other texture variations more noticeable.
If the part needs a specific roughness value, the drawing should define the roughness requirement separately. Bead blasting should not be used as a substitute for a controlled machined Ra requirement.
When Bead Blasting Works Well
Bead blasting works best when the buyer wants a consistent matte appearance and the part geometry allows controlled blasting access.
It is often useful for:
| Situation | Why Bead Blasting Helps |
| Visible aluminum housings | Reduces glare and creates a uniform matte appearance |
| Parts before anodizing | Helps create a consistent texture before color or clear anodizing |
| Low-volume prototypes | Improves visual presentation without complex cosmetic processing |
| Enclosures and covers | Helps hide minor machining marks when expectations are realistic |
| Brackets and frames | Creates a clean industrial finish |
| Parts with large visible surfaces | Reduces contrast between cutter paths |
| Batch appearance control | Helps parts look more consistent when process is controlled |
Bead blasting is especially common on aluminum CNC parts that will later receive clear or colored anodizing. However, the final anodized appearance still depends on alloy grade, blasting consistency, pre-finish surface quality, anodizing process, sealing, and handling.
For anodizing-related cosmetic risks, see our aluminum anodizing defects article.
When Bead Blasting Can Create Problems
Bead blasting is not suitable for every surface.
A part can be damaged or rejected if blasting is applied to the wrong area or used to hide a problem that should have been solved earlier.
| Risk Area | What Can Go Wrong |
| Sharp edges | Edges may become slightly rounded or visually softened |
| Threads | Media may remain inside threads or affect fit after finishing |
| Bearing bores | Blasting may alter surface texture or leave residue |
| Sealing faces | Texture change may affect contact or leakage risk |
| Datum surfaces | Functional reference surfaces may lose intended condition |
| Thin walls | Aggressive blasting may affect appearance or local edge condition |
| Deep pockets | Media may become trapped and hard to clean |
| Previously scratched surfaces | Deep scratches may remain visible after blasting |
| Mixed alloys | Different materials or alloy batches may appear different after finishing |
| Masking boundaries | Poor masking may create uneven transition lines |
Bead blasting should be planned before production, not added after the part is already machined and rejected for appearance.
If the surface is functional, the drawing should clearly state whether blasting is allowed, prohibited, or limited to selected cosmetic areas.
Bead Blasting Before Anodizing
Bead blasting is often used before anodizing to create a uniform matte texture on aluminum parts. This can improve visual consistency, but it also adds process risk.
The blasting step affects how the anodized surface looks. A part with inconsistent blasting may show uneven color, texture variation, cloudiness, or visible handling differences after anodizing.
Important review points include:
| Review Item | Why It Matters |
| Aluminum grade | Different alloys may anodize with different color or appearance |
| Visible surfaces | Cosmetic faces should be clearly marked |
| Media consistency | Different media or worn media may change texture |
| Media breakdown and gloss drift | Worn or fractured media may change texture, reflectivity, and appearance between production lots |
| Pressure and distance | Over-blasting may soften edges or change surface appearance |
| Masking areas | Threads, bores, sealing faces, and datum surfaces may need protection |
| Rack contact | Anodizing requires electrical contact points |
| Handling | Fingerprints, scratches, and dents may become more visible |
| Batch control | Parts blasted at different times may vary in appearance |
| Final inspection | Cosmetic acceptance should be agreed before production |
Media condition can also affect final appearance. Spherical media such as glass beads may gradually break down after repeated impact inside the blasting cabinet. As the media wears or fractures, the surface effect may shift from a softer peened texture toward a sharper, more cutting-like texture. This can change surface reflectivity, gloss level, or shade after anodizing, especially on visible aluminum enclosures or multi-part assemblies that need to match visually.
For high-visibility parts, buyers should not rely only on the media name. Batch consistency may also depend on media condition, blasting control, alloy consistency, anodizing process, and final inspection method.
Bead blasting can help create a more uniform matte base for anodizing, but it does not guarantee perfect color matching. The final result depends on alloy, surface preparation, anodizing process, sealing, and handling.
Masking and Protected Areas
A good bead blasting requirement should define not only where to blast, but also where not to blast.
Protected areas may include:
| Protected Area | Reason for Protection |
| Threaded holes | Prevents media residue and thread fit issues |
| Bearing bores | Protects size, surface texture, and fit |
| Sealing faces | Avoids texture changes that may affect sealing |
| Datum surfaces | Preserves inspection and assembly reference surfaces |
| Electrical contact areas | Maintains conductivity where required |
| Polished surfaces | Avoids unwanted matte texture |
| Laser-marked or engraved zones | Prevents contrast change or readability loss |
| Tight-fit holes | Avoids surface change that may affect assembly |
| Cosmetic boundary lines | Keeps visual transition clean and intentional |
Masking should be discussed before quotation. If the drawing does not show protected areas, the supplier may apply a uniform finish that does not match the part’s function.
For design notes related to holes, threads, datums, edge conditions, and protected functional surfaces, see our CNC machining design guide.
Bead Blasting and Dimensional Risk
Bead blasting is usually not treated like a thick coating, but it can still matter on sensitive features.
The main dimensional concern is not large material build-up. The concern is surface texture, edge condition, media residue, and whether the finish is applied to functional contact areas.
| Feature | Bead Blast Concern |
| Press-fit bore | Texture and residue may affect assembly behavior |
| Bearing seat | Surface condition may affect fit or seating |
| Threaded hole | Trapped media may affect screw engagement |
| Sealing face | Texture may affect gasket or O-ring contact |
| Sliding surface | Friction behavior may change |
| Datum face | Inspection reference may be affected |
| Thin edge | Edge may appear rounded or softened |
Small blind threaded holes need special attention. Fine blasting media can enter M2, M3, or other small internal threads, especially when the holes are not masked before blasting. If cutting oil, moisture, or cleaning residue remains inside the hole, the media may compact near the bottom of the thread and become difficult to remove with normal air blowing.
During assembly, this trapped residue may cause the screw to stop early, feel tight, cross-thread, or damage the first engaged threads. For small or critical blind threads, the drawing or RFQ should clarify whether threads must be masked, cleaned with a verified method, ultrasonically cleaned when required, or inspected after bead blasting and finishing.
For tight-tolerance features, the drawing should clarify whether the tolerance applies before or after bead blasting and whether blasting is allowed on that feature.
For tolerance-related planning, see our CNC machining tolerances guide.
Deburring Before Bead Blasting
Bead blasting does not replace deburring.
A burr that remains before bead blasting may become rolled, softened, embedded, or more difficult to identify afterward. In some cases, blasting can make sharp burrs less visually obvious without removing the functional problem.
| Burr Location | Risk After Bead Blasting |
| Thread entrance | Screw may start poorly or media may remain trapped |
| Hole edge | Burr may still interfere with assembly |
| Slot edge | Rolled burr may affect fit |
| Sealing face edge | Burr may damage gasket or O-ring |
| Bearing shoulder | Raised edge may affect seating |
| Thin wall edge | Edge may become visually uneven |
| Cosmetic edge | Blasting may highlight inconsistent deburring |
A good finishing route should confirm deburring before bead blasting, especially around threads, holes, grooves, sealing faces, and visible edges.
For more burr-control guidance, see our what is deburring article.
Inspection for Bead Blasted CNC Parts
Bead blasted parts should be inspected based on both appearance and function.
A simple visual check may be enough for low-risk internal brackets. Cosmetic housings, customer-facing parts, and functional surfaces need clearer acceptance criteria.
| Inspection Item | What to Check |
| Visible surface consistency | Texture should be reasonably uniform on agreed cosmetic faces |
| Scratches and dents | Deep pre-existing defects may remain visible |
| Masking boundaries | Protected areas should not be unintentionally blasted |
| Thread cleanliness | Media should not remain inside threaded holes |
| Bore and fit areas | Critical surfaces should be protected or verified |
| Edge condition | Edges should not be over-rounded or damaged |
| Anodized appearance | Color and texture should be checked after anodizing when applicable |
| Batch consistency | Parts in the same order should be compared under agreed conditions |
| Packaging | Finished surfaces should be protected from scratches and handling marks |
If cosmetic appearance is critical, the buyer should define visible surfaces, acceptable variation, inspection lighting, sample approval, or photo confirmation before production.
For inspection and report planning, see our quality assurance page.
Bead Blast Surface Finish Risk Matrix
The table below shows why bead blasting should be reviewed as part of the full manufacturing route.
| Risk Area | What Can Go Wrong | Prevention Before Production |
| Visible surface | Buyer and supplier may disagree on cosmetic expectations | Mark cosmetic faces clearly |
| Media selection | Texture may be too light, too rough, or inconsistent | Confirm expected matte appearance |
| Media condition | Worn or fractured media may change gloss or shade between lots | Review batch consistency when appearance matters |
| Pre-existing defects | Deep scratches or dents may remain visible | Review surface condition before finishing |
| Tool mark shadowing | Deeper cutter marks may still show through matte blasting | Control pre-blast machining marks or approve samples |
| Edges | Sharp edges may soften or look inconsistent | Define edge break and protected edges |
| Threads | Media may remain trapped | Mask or clean threads and verify after finishing |
| Small blind threads | Fine media may compact near the bottom of the hole | Mask, clean, or inspect critical small threads after blasting |
| Bores and fits | Surface texture may affect assembly | Protect functional fit areas |
| Sealing faces | Texture may affect contact | Mask or define acceptable surface condition |
| Anodizing sequence | Final color may vary | Review bead blasting and anodizing together |
| Batch consistency | Parts may look different between lots | Control media, process route, and inspection expectations |
| Packaging | Finished surfaces may scratch during shipment | Define packing and handling requirements |
This matrix is useful during design review, quotation review, and finishing approval.
Common Mistakes When Specifying Bead Blasting
Most bead blasting problems come from unclear cosmetic and functional requirements.
| Mistake | Possible Result |
| Only writing “bead blast finish” | Supplier does not know texture level or visible surfaces |
| Not marking cosmetic faces | Wrong surfaces may be treated or ignored |
| Not protecting functional surfaces | Threads, bores, sealing faces, or datum surfaces may be affected |
| Expecting bead blasting to remove deep scratches | Defects may remain visible after finishing |
| Expecting bead blasting to hide poor cutter paths | Tool marks or chatter may still show as shadow lines |
| Ignoring media condition | Gloss or shade may drift between production lots |
| Ignoring anodizing sequence | Final color or texture may look inconsistent |
| No masking notes | Boundary lines may be uneven or functional areas may be blasted |
| No cleaning requirement | Media may remain in holes, threads, or pockets |
| No packaging requirement | Matte surfaces may scratch during handling or shipment |
| No sample or acceptance standard | Buyer and supplier may judge appearance differently |
| Applying the same finish to all parts | Different materials or alloys may not look the same |
A clear bead blasting requirement should tell the supplier what surface must look consistent, what areas must be protected, and how the final finish should be inspected.
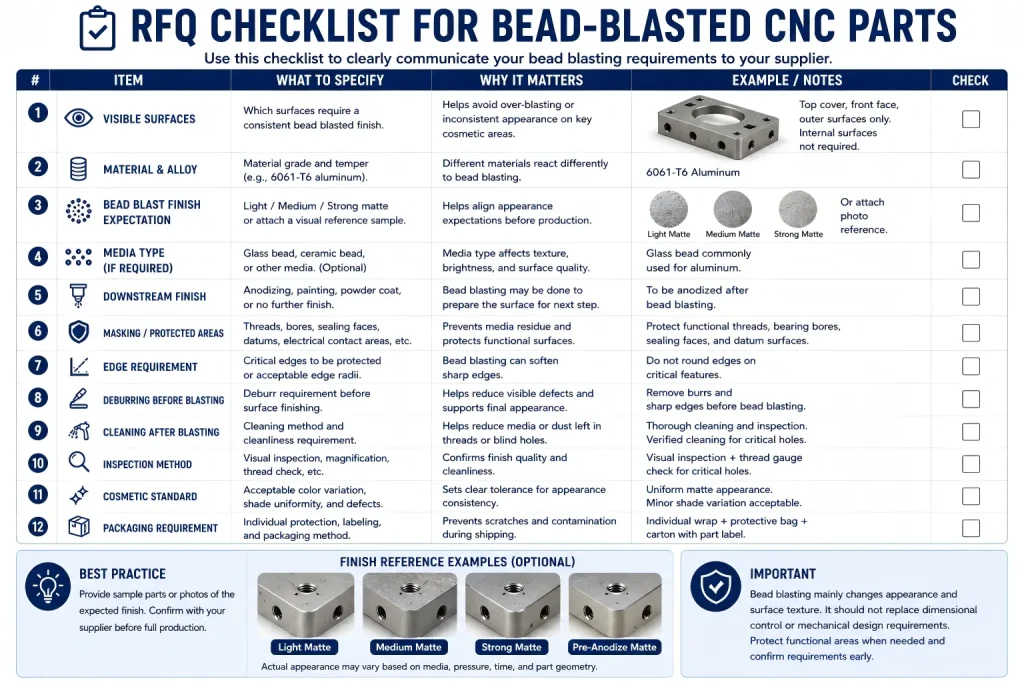
RFQ Checklist for Bead Blasted CNC Parts
Before sending a bead blasted CNC part for quotation, prepare the information that affects appearance, masking, finishing, inspection, and packaging.
| RFQ Item | What to Provide | Why It Matters |
| Material grade | Example: 6061, 7075, stainless steel, brass | Different materials finish differently |
| Visible surfaces | Mark cosmetic faces on the drawing | Prevents wrong surface treatment |
| Bead blast expectation | Light, medium, matte, satin, sample-based | Helps align appearance expectations |
| Media requirement | Glass bead, ceramic bead, aluminum oxide, or supplier review | Affects texture and appearance |
| Batch appearance requirement | Sample, photo standard, or lot comparison if needed | Helps control gloss and shade variation |
| Pre-blast surface condition | Machined finish, step-over, polishing, or acceptable cutter marks | Prevents tool mark shadowing after blasting |
| Downstream finish | Anodizing, painting, coating, passivation, or none | Changes final appearance and inspection |
| Masking areas | Threads, bores, sealing faces, datums, contact areas | Protects functional features |
| Small blind threads | Masking, verified cleaning, ultrasonic cleaning if required | Reduces media packing and assembly risk |
| Edge requirement | Edge break, no over-rounding, cosmetic edge notes | Prevents damaged or inconsistent edges |
| Deburring requirement | Burr-free holes, threads, grooves, and visible edges | Prevents burrs from being hidden by blasting |
| Cleaning requirement | Remove media, oil, dust, and residue | Prevents trapped contamination |
| Inspection method | Visual check, sample approval, photos, report if needed | Defines acceptance method |
| Cosmetic standard | Lighting, viewing distance, acceptable variation | Reduces appearance disputes |
| Quantity and batch | Prototype, low-volume, repeat production | Affects consistency planning |
| Packaging requirement | Individual wrapping, scratch protection, moisture control | Protects finished surfaces during shipment |
If the finish is important, send both the 2D drawing and 3D model. The 2D drawing should mark visible faces, protected surfaces, finish notes, masking areas, and inspection expectations. The 3D model helps review geometry, access, edges, pockets, and finishing feasibility.
How Rapid Efficient Supports Bead Blasted CNC Parts
Rapid Efficient can review bead blasted CNC machined parts before quotation, including material grade, cosmetic surfaces, protected areas, masking requirements, edge condition, surface finish expectations, anodizing sequence, inspection method, cleaning requirements, and packaging requirements.
For aluminum housings, stainless steel covers, electronic enclosures, automation brackets, robotics parts, fixture plates, and visible CNC components, we can help check whether bead blasting is suitable and which surfaces should be protected before finishing.
If you are sourcing CNC machined parts with bead blasted surfaces, send us your STEP file, 2D drawing, material requirement, finish notes, visible surface requirements, masking areas, quantity, and inspection expectations. Our team can review the machining and finishing requirements before quotation.
FAQ
What is a bead blast surface finish?
A bead blast surface finish is a matte textured finish created by blasting fine media against the part surface. It is often used to create a more uniform appearance on CNC machined parts.
Is bead blasting the same as sandblasting?
The terms are sometimes used loosely, but they are not always the same. Bead blasting often refers to glass bead or similar media that creates a smoother matte appearance, while sandblasting may refer to more aggressive abrasive blasting. The actual media should be confirmed before production.
Does bead blasting remove machining marks?
Bead blasting can reduce the visual contrast of light tool marks, but it does not reliably remove deep scratches, dents, gouges, chatter, or large step-over patterns. The surface condition before blasting still matters.
Why do tool marks still show after bead blasting?
Bead blasting changes micro-texture and light reflection, but deeper machining marks or macro-waviness may remain in the surface geometry. Under bright lighting or after anodizing, these marks can appear as faint shadow lines.
Can bead blasting affect dimensions?
Bead blasting is usually not treated like a thick coating, but it can affect surface texture, edge condition, residue, and functional contact areas. Tight bores, threads, sealing faces, and datum surfaces may need masking or final inspection.
Is bead blasting good before anodizing?
Bead blasting is often used before anodizing to create a uniform matte texture. However, final anodized appearance still depends on alloy grade, surface condition, blasting consistency, media condition, anodizing process, sealing, and handling.
Can worn blasting media affect the final appearance?
Yes. Worn or fractured media may change the surface texture, reflectivity, gloss, or shade between production lots. If appearance matching is important, media condition and batch consistency should be reviewed.
Should threaded holes be masked before bead blasting?
Threaded holes may need masking or careful cleaning depending on the requirement. Media trapped in threads or blind holes can cause assembly problems.
Why are small blind threaded holes risky after bead blasting?
Fine media can enter small blind threads and compact near the bottom, especially if oil or moisture remains inside the hole. This can make screws stop early, feel tight, or damage the first engaged threads during assembly.
What should I include in a bead blast finish RFQ?
Include material grade, visible surfaces, texture expectation, media requirement if specified, downstream finish, masking areas, edge requirements, deburring notes, cleaning requirements, inspection method, cosmetic standard, quantity, and packaging expectations.
Can bead blasted parts still be scratched?
Yes. Bead blasted surfaces can still scratch during handling, inspection, packaging, or shipping. If appearance is important, packaging and handling requirements should be discussed before production.