当稳定的塑料部件可以通过重复生产证明模具的合理性时,注塑成型变得有吸引力. 3D printing often fits changing designs, multiple variants, or geometries that would require difficult mold tooling. Either process can produce end-use parts when the material, 制造路线, and inspection meet the application’s requirements.
There is no universal quantity at which a project should switch from printing to molding. A part that needs a particular production resin may justify molding at a relatively small quantity. A part with uncertain demand or frequent design changes may remain a printing candidate at a larger quantity.
The useful comparison starts with three questions: what material and performance must the part deliver, how many acceptable parts will the current design need, and what evidence is still missing before buying a mold?
Set the Material Requirement Before Comparing Prices
“3D printed plastic” is not a complete material specification. Different printing processes use different feedstocks and produce different material structures.
| Printing route | Material entering the process | Details needed for a useful comparison |
|---|---|---|
| 频分复用 / FFF | Thermoplastic filament | 精确的材料, build direction, wall construction, infill where applicable, and support removal |
| SLA | Liquid photopolymer resin | Exact resin, washing and post-curing conditions, and properties after the specified treatment |
| SLS / 米杰夫 | Polymer powder | 精确的材料, build conditions, powder removal, 表面处理, 和调理 |
用于注塑成型, identify the resin grade, 加强, additives, and any required conditioning. A generic material family such as nylon does not establish equivalence between two quotations.
The same caution applies to an “ABS-like” printing resin. It may reproduce selected properties useful for a prototype, but the description does not make it the same material as injection-molded ABS. Formlabs’ 3D printing material selection guide distinguishes thermoplastic materials from cured photopolymer resins and explains why material selection must follow the properties needed for the application.
For a clip that remains loaded in a warm enclosure, room-temperature stiffness is only part of the requirement. Retention under sustained load, recovery after deflection, and exposure to heat or chemicals may determine whether the material is suitable.
For an FDM snap-fit, record the build orientation and examine whether failure occurs through the deposited material or along layer interfaces before changing the wall thickness. A weak printed sample may reveal a printing limitation rather than a weakness in the proposed molded design.
Avoid the opposite shortcut, 也: injection molding does not automatically make every design stronger. Gate position, 焊接线, reinforcement orientation, and local geometry can affect a molded part. Compare the finished component under its intended load and environment.
A cheaper manufacturing route is useful only after it can meet the same acceptance requirements.
Calculate the Crossover Using Accepted Parts
Compare the cost of parts that are ready to use. A raw print and a finished, inspected molded part are not equivalent quotation units.
Include required support or powder removal, curing where applicable, 精加工, 检查, and expected production losses in the agreed cost scope. Separate fixed startup costs from costs that increase with the quantity delivered.
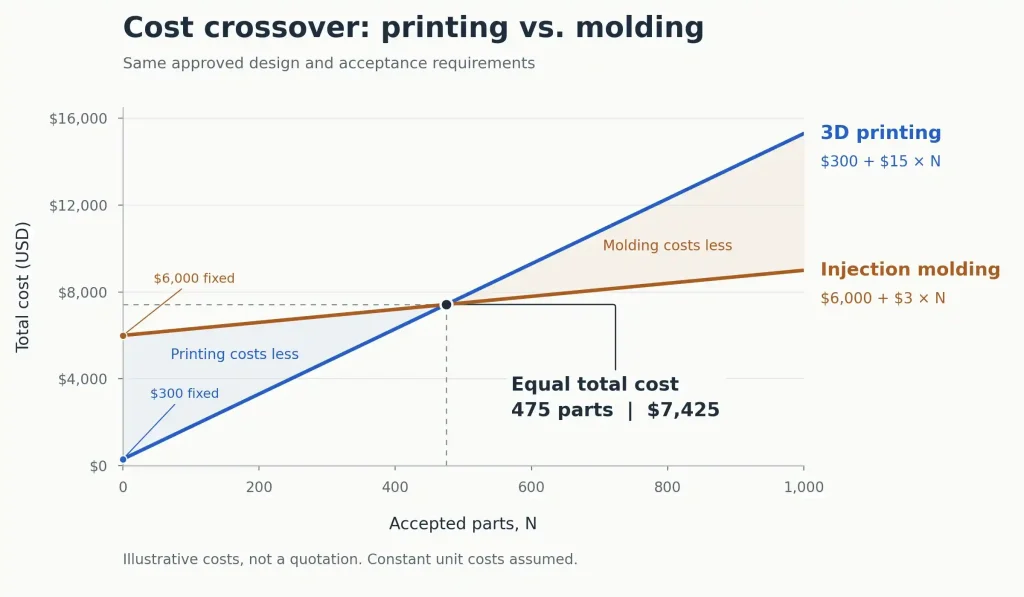
Consider the following hypothetical quotations. These numbers illustrate the calculation; they are not supplier prices or industry benchmarks.
| Cost item | 33D打印 | 注塑 |
|---|---|---|
| Fixed setup and agreed startup costs | $300 | $6,000 |
| Variable cost per accepted part | $15 | $3 |
For this example, the molding startup cost includes the mold and agreed initial approval work. Both routes meet the same functional and finish requirements. The design remains unchanged, and the quoted unit costs stay constant over the quantities being compared. Freight and tax are excluded from both.
如果 氮 is the number of accepted parts:
Total printing cost = $300 + $15 × N
Total molding cost = $6,000 + $3 × N
The costs are equal when:
N = ($6,000 - $300) ÷ ($15 - $3) = 475 accepted parts
| Accepted quantity | Total printing cost | Total molding cost |
|---|---|---|
| 200 | $3,300 | $6,600 |
| 475 | $7,425 | $7,425 |
| 1,000 | $15,300 | $9,000 |
The 475-part crossover belongs to these assumptions; it is not a general threshold for buying a mold.

A different mold price, 印刷工艺, cavity count, 完成要求, or production yield changes the result. Quantity discounts and repeated setup charges can also make the cost relationship different from these straight lines.
The calculation has another limit: if molding has both a higher fixed cost and an equal or higher variable cost, increasing quantity alone will not produce a cost crossover under those quotations.
Count the Parts You Can Use Before the Next Revision
The quantity in the calculation should reflect credible demand for a design the tooling can produce.
Suppose a team forecasts 1,000 clips but plans to release only 200 before evaluating a revised hook. Using all 1,000 parts to justify the current mold assumes the later design will remain compatible with that tool. That assumption needs review.
A change might require a replaceable insert, a local mold modification, or a more extensive rebuild. For features likely to need adjustment, agree whether a steel-safe approach or replaceable tooling is appropriate before cutting the mold. Removing metal generally creates room for more plastic: it can enlarge an external feature or reduce a hole formed by a core pin. The direction and amount of adjustment must be agreed feature by feature. Changes may also require another sample approval.
Printing does not make revisions free. A new version can require build preparation, support changes, 尺寸检查, and repeated functional testing. It generally avoids changing a dedicated production cavity, but the revised part still needs approval.
Repeated orders can support a mold investment when they use the same approved design. 反过来, a forecast spread across several incompatible variants should not be treated as one common production quantity.
If a suitable mold already exists, compare the costs that remain to be incurred. Charging its full historical purchase price to a new production decision can give a misleading result.
A Printed Snap-Fit Does Not Validate a Molded Clip
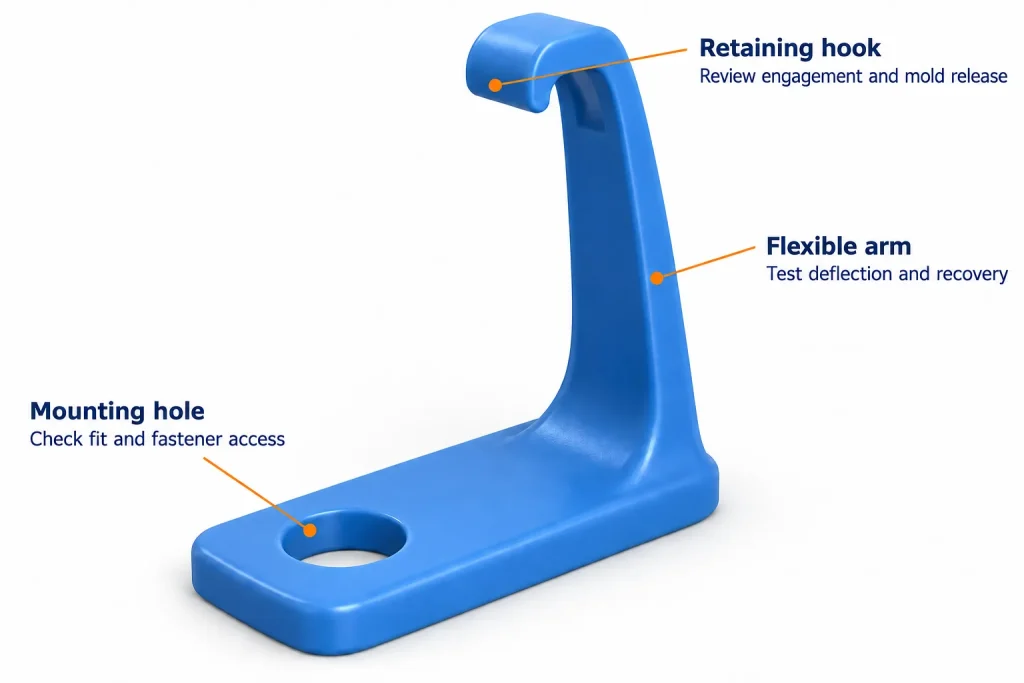
Consider a retaining clip with a mounting hole, a flexible arm, and a hook. This is a representative design example, not a reported customer project.
Review the mounting hole, flexible arm, and retaining hook as separate functional features.

The mounting hole helps establish whether the part fits its assembly and whether a fastener can be installed. A printed sample can reveal access problems or an incorrect mounting position. Its measured dimensions should still be recorded; an assembly that fits because a sample happened to print oversize does not validate the nominal CAD geometry.
The flexible arm raises a different question. A successful first assembly does not establish repeated snap performance or retention under sustained load. Test the insertion force, retention force, recovery, and repeated operation relevant to the application. Include the intended temperature and material condition where they affect performance.
The retaining hook must work in the assembly and release from the mold. Build orientation or removable print supports may allow a feature that needs a different parting arrangement, an opening, a geometry change, or a mold mechanism in injection molding. 这 底切释放指南 explains how to review that release path.
Before ordering tooling, review draft, wall transitions, 登机口位置, and potential weld-line locations around the loaded arm. In molding, flow fronts can split around a core pin and meet again near a loaded feature. A printed sample does not reproduce that flow pattern. For a critical clip, use flow simulation where needed to assess the filling pattern, then test molded samples under the relevant loads. Introducing molding requirements late can change the geometry that the printed sample appeared to validate.
A useful prototype record states what was tested, which material and build conditions were used, and what passed. It also identifies what remains unproven in the intended molded resin and production process.
Compare Finished-Part Delivery, Not Machine Time
Printing build time and injection molding cycle time describe only parts of the delivery route.
A printed batch may require build preparation, 冷却, support or powder removal, 洗涤, 养护, 精加工, 和检查. Which steps apply depends on the printing process. Build orientation and the number of parts that fit in a build can change both delivery time and unit cost.
The first molded batch includes tooling work: 设计评审, mold manufacture, 采样, corrections where needed, and approval. Later batches can follow a much shorter route, but scheduling, 材料准备, production setup, and inspection still matter.
Compare the date when each route can deliver the required quantity of accepted parts. A fast first sample and a fast repeat production order are different purchasing needs.
Finish requirements also need a common definition. State which surfaces are cosmetic, which contact another component, and which require a specific texture or appearance. Printing layer height is not a dimensional tolerance, and a mold finish grade alone does not guarantee the final plastic appearance. 这 injection molding surface finish guide covers the relationship between tooling finish, 树脂, and molded appearance.
There is also a hybrid route: polymer 3D-printed mold inserts can be used for selected short-run injection molding trials. The parts are injection molded, but insert life depends on the printed tooling material, cavity geometry, injected resin, and molding conditions. Set the trial quantity from demonstrated insert durability and the required dimensional stability rather than a universal part-count limit.
Formlabs’ printed injection mold guidance also notes the slower heat transfer of polymer tooling compared with metal molds. These trials can provide useful evidence, but their cooling conditions and results should not automatically be treated as representative of the eventual production mold.
Use Prototype Results to Plan Production Approval
The transition to molding should carry forward the useful evidence from printing and close the gaps it leaves.
Keep the approved geometry revision, the prototype test results, and the acceptance requirements together. For the clip example, that means retaining the mounting checks while repeating the relevant loading and snap tests on parts made in the selected molded resin.
Evaluate actual molded samples for the required dimensions, 外貌, 和功能. Where the tool has multiple cavities, define how cavity identification and sampling will be handled. A successful prototype or a satisfactory first shot does not establish repeat production capability by itself.
这 首件检验指南 explains how to connect the drawing revision, measured features, and approval record. Functional tests remain part of the plan when a dimensional report cannot demonstrate the required behavior.
A qualified printed part may remain the production solution. Moving to molding should follow the material requirements, credible demand, and cost comparison—not an assumption that every printed product must eventually be molded.
If you are deciding whether to invest in a mold, share your CAD model, 绘画, intended resin, expected quantities, likely design changes, and printed-sample test results through our 注塑模具审查. Identify the material, 成本, or validation questions that still affect the decision. This gives the tooling review a clear brief before mold design and quotation.